Circuit Breaker | Circuit Breaker | ||||||||||||||||||||||||||||||
The | Для выявления проблемных эндпоинтов используются настройки | ||||||||||||||||||||||||||||||
Example: | Пример: | ||||||||||||||||||||||||||||||
yaml apiVersion: networking.istio.io/v1beta1 kind: DestinationRule metadata: name: reviews-cb-policy spec: host: reviews.prod.svc.cluster.local trafficPolicy: connectionPool: tcp: maxConnections: 100 # The maximum number of connections to the host (cumulative for all endpoints) http: maxRequestsPerConnection: 10 # The connection will be re-established after every 10 requests outlierDetection: consecutive5xxErrors: 7 # Seven consecutive errors are allowed (including 5XX, TCP and HTTP timeouts) interval: 5m # over 5 minutes. baseEjectionTime: 15m # Upon reaching the error limit, the endpoint will be excluded from balancing for 15 minutes. | yaml apiVersion: networking.istio.io/v1beta1 kind: DestinationRule metadata: name: reviews-cb-policy spec: host: reviews.prod.svc.cluster.local trafficPolicy: connectionPool: tcp: maxConnections: 100 # Максимальное число коннектов в сторону host, суммарно для всех эндпоинтов. http: maxRequestsPerConnection: 10 # Каждые 10 запросов коннект будет пересоздаваться. outlierDetection: consecutive5xxErrors: 7 # Допустимо 7 ошибок (включая пятисотые, TCP-таймауты и HTTP-таймауты) interval: 5m # в течение пяти минут, baseEjectionTime: 15m # после которых эндпоинт будет исключен из балансировки на 15 минут. | ||||||||||||||||||||||||||||||
Additionally, the VirtualService resource is used to configure the HTTP timeouts. These timeouts are also taken into account when calculating error statistics for endpoints. | А также для настройки HTTP-таймаутов используется ресурс VirtualService. Эти таймауты также учитываются при подсчете статистики ошибок на эндпоинтах. | ||||||||||||||||||||||||||||||
Example: | Пример: | ||||||||||||||||||||||||||||||
yaml apiVersion: networking.istio.io/v1beta1 kind: VirtualService metadata: name: my-productpage-rule namespace: myns spec: hosts:
| yaml apiVersion: networking.istio.io/v1beta1 kind: VirtualService metadata: name: my-productpage-rule namespace: myns spec: hosts:
| ||||||||||||||||||||||||||||||
gRPC balancing | Балансировка gRPC | ||||||||||||||||||||||||||||||
Caution! Assign a name with the | Важно! Чтобы балансировка gRPC-сервисов заработала автоматически, присвойте name с префиксом или значением | ||||||||||||||||||||||||||||||
Locality Failover | Locality Failover | ||||||||||||||||||||||||||||||
|
| ||||||||||||||||||||||||||||||
Istio allows you to configure a priority-based locality (geographic location) failover between endpoints. Istio uses node labels with the appropriate hierarchy to define the zone: | Istio позволяет настроить приоритетный географический фейловер между эндпоинтами. Для определения зоны Istio использует лейблы узлов с соответствующей иерархией: | ||||||||||||||||||||||||||||||
|
| ||||||||||||||||||||||||||||||
This comes in handy for inter-cluster failover when used together with a multicluster. | Это полезно для межкластерного фейловера при использовании совместно с мультикластером. | ||||||||||||||||||||||||||||||
|
| ||||||||||||||||||||||||||||||
Example: | Пример: | ||||||||||||||||||||||||||||||
yaml apiVersion: networking.istio.io/v1beta1 kind: DestinationRule metadata: name: helloworld spec: host: helloworld trafficPolicy: loadBalancer: localityLbSetting: enabled: true # LF is enabled outlierDetection: # outlierDetection must be enabled consecutive5xxErrors: 1 interval: 1s baseEjectionTime: 1m | yaml apiVersion: networking.istio.io/v1beta1 kind: DestinationRule metadata: name: helloworld spec: host: helloworld trafficPolicy: loadBalancer: localityLbSetting: enabled: true # Включили LF. outlierDetection: # outlierDetection включить обязательно. consecutive5xxErrors: 1 interval: 1s baseEjectionTime: 1m | ||||||||||||||||||||||||||||||
Retry | Retry | ||||||||||||||||||||||||||||||
You can use the VirtualService resource to configure Retry for requests. | С помощью ресурса VirtualService можно настроить Retry для запросов. | ||||||||||||||||||||||||||||||
| Внимание! По умолчанию при возникновении ошибок все запросы (включая POST-запросы) выполняются повторно до трех раз. | ||||||||||||||||||||||||||||||
Example: | Пример: | ||||||||||||||||||||||||||||||
yaml apiVersion: networking.istio.io/v1beta1 kind: VirtualService metadata: name: ratings-route spec: hosts:
| yaml apiVersion: networking.istio.io/v1beta1 kind: VirtualService metadata: name: ratings-route spec: hosts:
| ||||||||||||||||||||||||||||||
Canary | Canary | ||||||||||||||||||||||||||||||
| Важно! Istio отвечает лишь за гибкую маршрутизацию запросов, которая опирается на спецзаголовки запросов (например, cookie) или просто на случайность. За настройку этой маршрутизации и «переключение» между канареечными версиями отвечает CI/CD-система. | ||||||||||||||||||||||||||||||
The idea is that two Deployments with different versions of the application are deployed in the same namespace. The Pods of different versions have different labels ( | Подразумевается, что в одном пространстве имён развёрнуты два Deployment с разными версиями приложения. У подов разных версий разные лейблы ( | ||||||||||||||||||||||||||||||
You have to configure two custom resources:
| Требуется настроить два кастомных ресурса:
| ||||||||||||||||||||||||||||||
Example: | Пример: | ||||||||||||||||||||||||||||||
yaml apiVersion: networking.istio.io/v1beta1 kind: DestinationRule metadata: name: productpage-canary spec: host: productpage subsets are only available when accessing the host via the VirtualService from a Pod managed by Istio. These subsets must be defined in the routes. subsets:
| yaml apiVersion: networking.istio.io/v1beta1 kind: DestinationRule metadata: name: productpage-canary spec: host: productpage subset’ы доступны только при обращении к хосту через VirtualService из пода под управлением Istio. Эти subset’ы должны быть указаны в маршрутах. subsets:
| ||||||||||||||||||||||||||||||
Cookie-based routing | Распределение по наличию cookie | ||||||||||||||||||||||||||||||
yaml apiVersion: networking.istio.io/v1beta1 kind: VirtualService metadata: name: productpage-canary spec: hosts:
| yaml apiVersion: networking.istio.io/v1beta1 kind: VirtualService metadata: name: productpage-canary spec: hosts:
| ||||||||||||||||||||||||||||||
Probability-based routing | Распределение по вероятности | ||||||||||||||||||||||||||||||
yaml apiVersion: networking.istio.io/v1beta1 kind: VirtualService metadata: name: productpage-canary spec: hosts:
| yaml apiVersion: networking.istio.io/v1beta1 kind: VirtualService metadata: name: productpage-canary spec: hosts:
| ||||||||||||||||||||||||||||||
Ingress to publish applications | Ingress для публикации приложений | ||||||||||||||||||||||||||||||
Istio Ingress Gateway | Istio Ingress Gateway | ||||||||||||||||||||||||||||||
Example: | Пример: | ||||||||||||||||||||||||||||||
yaml apiVersion: deckhouse.io/v1alpha1 kind: IngressIstioController metadata: name: main spec: ingressGatewayClass contains the label selector value used to create the Gateway resource ingressGatewayClass: istio-hp inlet: HostPort hostPort: httpPort: 80 httpsPort: 443 nodeSelector: node-role.deckhouse.io/frontend: “” tolerations:
| yaml apiVersion: deckhouse.io/v1alpha1 kind: IngressIstioController metadata: name: main spec: ingressGatewayClass содержит значение селектора меток, используемое при создании ресурса Gateway. ingressGatewayClass: istio-hp inlet: HostPort hostPort: httpPort: 80 httpsPort: 443 nodeSelector: node-role.deckhouse.io/frontend: “” tolerations:
| ||||||||||||||||||||||||||||||
yaml apiVersion: v1 kind: Secret metadata: name: app-tls-secert namespace: d8-ingress-istio # note the namespace isn’t app-ns type: kubernetes.io/tls data: tls.crt: | | yaml apiVersion: v1 kind: Secret metadata: name: app-tls-secert namespace: d8-ingress-istio # Обратите внимание, пространство имён не является app-ns. type: kubernetes.io/tls data: tls.crt: | | ||||||||||||||||||||||||||||||
yaml apiVersion: networking.istio.io/v1beta1 kind: Gateway metadata: name: gateway-app namespace: app-ns spec: selector: label selector for using the Istio Ingress Gateway main-hp istio.deckhouse.io/ingress-gateway-class: istio-hp servers:
| yaml apiVersion: networking.istio.io/v1beta1 kind: Gateway metadata: name: gateway-app namespace: app-ns spec: selector: Селектор меток для использования Istio Ingress Gateway main-hp. istio.deckhouse.io/ingress-gateway-class: istio-hp servers:
| ||||||||||||||||||||||||||||||
yaml apiVersion: networking.istio.io/v1beta1 kind: VirtualService metadata: name: vs-app namespace: app-ns spec: gateways:
| yaml apiVersion: networking.istio.io/v1alpha3 kind: VirtualService metadata: name: vs-app namespace: app-ns spec: gateways:
| ||||||||||||||||||||||||||||||
NGINX Ingress | NGINX Ingress | ||||||||||||||||||||||||||||||
To use Ingress, you need to:
| Для работы с NGINX Ingress требуется подготовить:
| ||||||||||||||||||||||||||||||
Examples: | Примеры: | ||||||||||||||||||||||||||||||
yaml
apiVersion: networking.k8s.io/v1
kind: Ingress
metadata:
name: productpage
namespace: bookinfo
annotations:
Nginx proxies traffic to the ClusterIP instead of pods’ own IPs.
nginx.ingress.kubernetes.io/service-upstream: “true”
In Istio, all routing is carried out based on the
| yaml
apiVersion: networking.k8s.io/v1
kind: Ingress
metadata:
name: productpage
namespace: bookinfo
annotations:
Просим nginx проксировать трафик на ClusterIP вместо собственных IP подов.
nginx.ingress.kubernetes.io/service-upstream: “true”
В Istio вся маршрутизация осуществляется на основе
| ||||||||||||||||||||||||||||||
yaml apiVersion: v1 kind: Service metadata: name: productpage namespace: bookinfo spec: ports:
| yaml apiVersion: v1 kind: Service metadata: name: productpage namespace: bookinfo spec: ports:
| ||||||||||||||||||||||||||||||
Authorization configuration examples | Примеры настройки авторизации | ||||||||||||||||||||||||||||||
Decision-making algorithm | Алгоритм принятия решения | ||||||||||||||||||||||||||||||
The following algorithm for deciding the fate of a request becomes active after
| Важно! Как только для приложения создается
| ||||||||||||||||||||||||||||||
In other words, if you explicitly deny something, then only this restrictive rule will work. If you explicitly allow something, only explicitly authorized requests will be allowed (however, restrictions will stay in force and have precedence). | Иными словами, если вы явно что-то запретили, работает только ваш запрет. Если же вы что-то явно разрешили, теперь разрешены только явно одобренные запросы (запреты никуда не исчезают и имеют приоритет). | ||||||||||||||||||||||||||||||
| Важно! Для работы политик, основанных на высокоуровневых параметрах, таких как пространства имён или principal, необходимо, чтобы все вовлеченные сервисы работали под управлением Istio. Также между приложениями должен быть организован Mutual TLS. | ||||||||||||||||||||||||||||||
Examples:
| Примеры:
| ||||||||||||||||||||||||||||||
yaml apiVersion: security.istio.io/v1beta1 kind: AuthorizationPolicy metadata: name: deny-post-requests namespace: foo spec: selector: matchLabels: app: myapp action: DENY rules:
| yaml apiVersion: security.istio.io/v1beta1 kind: AuthorizationPolicy metadata: name: deny-post-requests namespace: foo spec: selector: matchLabels: app: myapp action: DENY rules:
| ||||||||||||||||||||||||||||||
|
| ||||||||||||||||||||||||||||||
yaml apiVersion: security.istio.io/v1beta1 kind: AuthorizationPolicy metadata: name: deny-all namespace: foo spec: selector: matchLabels: app: myapp action: ALLOW # The default value, can be skipped. rules:
| yaml apiVersion: security.istio.io/v1beta1 kind: AuthorizationPolicy metadata: name: deny-all namespace: foo spec: selector: matchLabels: app: myapp action: ALLOW # default, можно не указывать. rules:
| ||||||||||||||||||||||||||||||
|
| ||||||||||||||||||||||||||||||
yaml apiVersion: security.istio.io/v1beta1 kind: AuthorizationPolicy metadata: name: deny-all namespace: foo spec: selector: matchLabels: app: myapp action: ALLOW # The default value, can be skipped. rules: [] | yaml apiVersion: security.istio.io/v1beta1 kind: AuthorizationPolicy metadata: name: deny-all namespace: foo spec: selector: matchLabels: app: myapp action: ALLOW # default, можно не указывать. rules: [] | ||||||||||||||||||||||||||||||
|
| ||||||||||||||||||||||||||||||
yaml apiVersion: security.istio.io/v1beta1 kind: AuthorizationPolicy metadata: name: allow-all namespace: foo spec: selector: matchLabels: app: myapp rules:
| yaml apiVersion: security.istio.io/v1beta1 kind: AuthorizationPolicy metadata: name: allow-all namespace: foo spec: selector: matchLabels: app: myapp rules:
| ||||||||||||||||||||||||||||||
Deny all actions for the foo namespace | Запретить все действия в рамках пространства имён foo | ||||||||||||||||||||||||||||||
There are two ways you can do that: | Два способа: | ||||||||||||||||||||||||||||||
|
| ||||||||||||||||||||||||||||||
yaml apiVersion: security.istio.io/v1beta1 kind: AuthorizationPolicy metadata: name: deny-all namespace: foo spec: action: DENY rules:
| yaml apiVersion: security.istio.io/v1beta1 kind: AuthorizationPolicy metadata: name: deny-all namespace: foo spec: action: DENY rules:
| ||||||||||||||||||||||||||||||
|
| ||||||||||||||||||||||||||||||
yaml apiVersion: security.istio.io/v1beta1 kind: AuthorizationPolicy metadata: name: deny-all namespace: foo spec: {} | yaml apiVersion: security.istio.io/v1beta1 kind: AuthorizationPolicy metadata: name: deny-all namespace: foo spec: {} | ||||||||||||||||||||||||||||||
Deny requests from the foo NS only | Запретить доступ только из пространства имён foo | ||||||||||||||||||||||||||||||
yaml apiVersion: security.istio.io/v1beta1 kind: AuthorizationPolicy metadata: name: deny-from-ns-foo namespace: myns spec: action: DENY rules:
| yaml apiVersion: security.istio.io/v1beta1 kind: AuthorizationPolicy metadata: name: deny-from-ns-foo namespace: myns spec: action: DENY rules:
| ||||||||||||||||||||||||||||||
Allow requests for the foo NS only | Разрешить запросы только в рамках нашего пространства имён foo | ||||||||||||||||||||||||||||||
yaml apiVersion: security.istio.io/v1beta1 kind: AuthorizationPolicy metadata: name: allow-intra-namespace-only namespace: foo spec: action: ALLOW rules:
| yaml apiVersion: security.istio.io/v1beta1 kind: AuthorizationPolicy metadata: name: allow-intra-namespace-only namespace: foo spec: action: ALLOW rules:
| ||||||||||||||||||||||||||||||
Allow requests from anywhere in the cluster | Разрешить из любого места в нашем кластере | ||||||||||||||||||||||||||||||
yaml apiVersion: security.istio.io/v1beta1 kind: AuthorizationPolicy metadata: name: allow-all-from-my-cluster namespace: myns spec: action: ALLOW rules:
| yaml apiVersion: security.istio.io/v1beta1 kind: AuthorizationPolicy metadata: name: allow-all-from-my-cluster namespace: myns spec: action: ALLOW rules:
| ||||||||||||||||||||||||||||||
Allow any requests for foo or bar clusters | Разрешить любые запросы только кластеров foo или bar | ||||||||||||||||||||||||||||||
yaml apiVersion: security.istio.io/v1beta1 kind: AuthorizationPolicy metadata: name: allow-all-from-foo-or-bar-clusters-to-ns-baz namespace: baz spec: action: ALLOW rules:
| yaml apiVersion: security.istio.io/v1beta1 kind: AuthorizationPolicy metadata: name: allow-all-from-foo-or-bar-clusters-to-ns-baz namespace: baz spec: action: ALLOW rules:
| ||||||||||||||||||||||||||||||
Allow any requests from foo or bar clusters where the namespace is baz | Разрешить любые запросы только кластеров foo или bar, при этом из пространства имён baz | ||||||||||||||||||||||||||||||
yaml apiVersion: security.istio.io/v1beta1 kind: AuthorizationPolicy metadata: name: allow-all-from-foo-or-bar-clusters-to-ns-baz namespace: baz spec: action: ALLOW rules:
| yaml apiVersion: security.istio.io/v1beta1 kind: AuthorizationPolicy metadata: name: allow-all-from-foo-or-bar-clusters-to-ns-baz namespace: baz spec: action: ALLOW rules:
| ||||||||||||||||||||||||||||||
Allow from any cluster (via mTLS) | Разрешить из любого кластера (по mTLS) | ||||||||||||||||||||||||||||||
| Важно! Если есть запрещающие правила, у них будет приоритет. Смотри алгоритм. | ||||||||||||||||||||||||||||||
Example: | Пример: | ||||||||||||||||||||||||||||||
yaml apiVersion: security.istio.io/v1beta1 kind: AuthorizationPolicy metadata: name: allow-all-from-any-cluster-with-mtls namespace: myns spec: action: ALLOW rules:
| yaml apiVersion: security.istio.io/v1beta1 kind: AuthorizationPolicy metadata: name: allow-all-from-any-cluster-with-mtls namespace: myns spec: action: ALLOW rules:
| ||||||||||||||||||||||||||||||
Allow all requests from anywhere (including no mTLS - plain text traffic) | Разрешить вообще откуда угодно (в том числе без mTLS) | ||||||||||||||||||||||||||||||
yaml apiVersion: security.istio.io/v1beta1 kind: AuthorizationPolicy metadata: name: allow-all-from-any namespace: myns spec: action: ALLOW rules: [{}] | yaml apiVersion: security.istio.io/v1beta1 kind: AuthorizationPolicy metadata: name: allow-all-from-any namespace: myns spec: action: ALLOW rules: [{}] | ||||||||||||||||||||||||||||||
Setting up federation for two clusters using the IstioFederation CR | Устройство федерации из двух кластеров с помощью кастомного ресурса IstioFederation | ||||||||||||||||||||||||||||||
Available only in Enterprise Edition. | Доступно в редакциях Enterprise Edition и Certified Security Edition Pro (1.67). | ||||||||||||||||||||||||||||||
Cluster A: | Cluster A: | ||||||||||||||||||||||||||||||
yaml apiVersion: deckhouse.io/v1alpha1 kind: IstioFederation metadata: name: cluster-b spec: metadataEndpoint: https://istio.k8s-b.example.com/metadata/ trustDomain: cluster-b.local | yaml apiVersion: deckhouse.io/v1alpha1 kind: IstioFederation metadata: name: cluster-b spec: metadataEndpoint: https://istio.k8s-b.example.com/metadata/ trustDomain: cluster-b.local | ||||||||||||||||||||||||||||||
Cluster B: | Cluster B: | ||||||||||||||||||||||||||||||
yaml apiVersion: deckhouse.io/v1alpha1 kind: IstioFederation metadata: name: cluster-a spec: metadataEndpoint: https://istio.k8s-a.example.com/metadata/ trustDomain: cluster-a.local | yaml apiVersion: deckhouse.io/v1alpha1 kind: IstioFederation metadata: name: cluster-a spec: metadataEndpoint: https://istio.k8s-a.example.com/metadata/ trustDomain: cluster-a.local | ||||||||||||||||||||||||||||||
Setting up multicluster for two clusters using the IstioMulticluster CR | Устройство мультикластера из двух кластеров с помощью ресурса IstioMulticluster | ||||||||||||||||||||||||||||||
Available only in Enterprise Edition. | Доступно только в редакции Enterprise Edition. | ||||||||||||||||||||||||||||||
Cluster A: | Cluster A: | ||||||||||||||||||||||||||||||
yaml apiVersion: deckhouse.io/v1alpha1 kind: IstioMulticluster metadata: name: cluster-b spec: metadataEndpoint: https://istio.k8s-b.example.com/metadata/ | yaml apiVersion: deckhouse.io/v1alpha1 kind: IstioMulticluster metadata: name: cluster-b spec: metadataEndpoint: https://istio.k8s-b.example.com/metadata/ | ||||||||||||||||||||||||||||||
Cluster B: | Cluster B: | ||||||||||||||||||||||||||||||
yaml apiVersion: deckhouse.io/v1alpha1 kind: IstioMulticluster metadata: name: cluster-a spec: metadataEndpoint: https://istio.k8s-a.example.com/metadata/ | yaml apiVersion: deckhouse.io/v1alpha1 kind: IstioMulticluster metadata: name: cluster-a spec: metadataEndpoint: https://istio.k8s-a.example.com/metadata/ | ||||||||||||||||||||||||||||||
Control the data-plane behavior | Управление поведением data plane | ||||||||||||||||||||||||||||||
Prevent istio-proxy from terminating before the main application’s connections are closed | Предотвратить завершение работы istio-proxy до завершения соединений основного приложения | ||||||||||||||||||||||||||||||
By default, during termination, all containers in a Pod, including istio-proxy one, receive SIGTERM signal simultaneously. But some applications need time to properly handle the termination and sometimes they need to do some network requests. It isn’t possible when the istio-proxy stops before the application do. The solution is to add a preStop hook which evaluates the application’s activity via discovering application’s network sockets and let the sidecar stop when they aren’t in the network namespace. | По умолчанию в процессе остановки пода все контейнеры, включая istio-proxy, получают сигнал SIGTERM одновременно. Но некоторым приложениям для правильного завершения работы необходимо время и иногда дополнительная сетевая активность. Это невозможно, если istio-proxy завершился раньше. | ||||||||||||||||||||||||||||||
The annotation below adds the preStop hook to istio-proxy container in application’s Pod: | Решение — добавить в istio-proxy preStop-хук для оценки активности прикладных контейнеров, а единственный доступный метод — это выявление сетевых сокетов приложения, и если таковых нет, тогда можно останавливать контейнер. | ||||||||||||||||||||||||||||||
yaml annotations: inject.istio.io/templates: “sidecar,d8-hold-istio-proxy-termination-until-application-stops” | Аннотация ниже добавляет описанный выше preStop-хук в контейнер istio-proxy прикладного пода: | ||||||||||||||||||||||||||||||
| yaml annotations: inject.istio.io/templates: “sidecar,d8-hold-istio-proxy-termination-until-application-stops” | ||||||||||||||||||||||||||||||
Unlike the | Ограничения режима перенаправления прикладного трафика
| ||||||||||||||||||||||||||||||
| В отличие от режима | ||||||||||||||||||||||||||||||
Each of the workarounds removes traffic from Istio’s control, which in turn removes encryption of traffic between application services. |
| ||||||||||||||||||||||||||||||
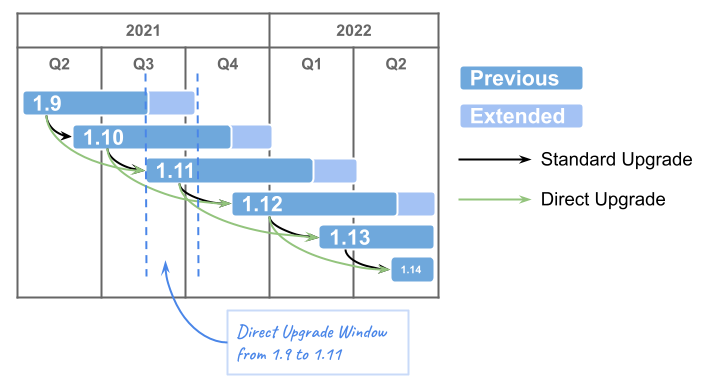
Upgrading Istio | Каждый из обходных вариантов выводит трафик из-под контроля Istio, что в свою очередь убирает шифрование трафика между прикладными сервисами. | ||||||||||||||||||||||||||||||
Upgrading Istio control-plane | Обновление Istio | ||||||||||||||||||||||||||||||
| Обновление control plane Istio | ||||||||||||||||||||||||||||||
To find all Pods with old Istio revision (in the example — version 19), execute the command: |
| ||||||||||||||||||||||||||||||
shell
kubectl get pods -A -o json | jq –arg revision “v1x19” | Чтобы найти все поды под управлением старой ревизии Istio (в примере — версия 19), выполните команду: | ||||||||||||||||||||||||||||||
Upgrading to Istio 1.25 is only possible from version 1.21. | shell
kubectl get pods -A -o json | jq –arg revision “v1x19” | ||||||||||||||||||||||||||||||
Auto upgrading istio data-plane | Обновление до версии Istio 1.25 возможно только с версии 1.21. | ||||||||||||||||||||||||||||||
Available only in Enterprise Edition. | Автоматическое обновление data plane Istio | ||||||||||||||||||||||||||||||
To automate istio-sidecar upgrading, set a label | Доступно в редакциях Enterprise Edition и Certified Security Edition Pro (1.67). | ||||||||||||||||||||||||||||||
Customizing istio-proxy sidecar resource management | Для автоматизации обновления istio-sidecar’ов установите лейбл | ||||||||||||||||||||||||||||||
You can override the global istio-proxy sidecar resource limits for specific workloads by adding annotations to your application Pods. | Настройка ресурсов istio-proxy sidecar | ||||||||||||||||||||||||||||||
Supported annotations | Для переопределения глобальных ограничений ресурсов для istio-proxy sidecar в отдельных рабочих нагрузках через аннотации, поддерживаются следующие аннотации: | ||||||||||||||||||||||||||||||
Use these Pod annotations to customize sidecar resources: | Поддерживаемые аннотации | ||||||||||||||||||||||||||||||
|
| ||||||||||||||||||||||||||||||
Configuration Examples | Примеры конфигурации | ||||||||||||||||||||||||||||||
For Deployments: | Для Deployment: | ||||||||||||||||||||||||||||||
yaml apiVersion: apps/v1 kind: Deployment metadata: | yaml apiVersion: apps/v1 kind: Deployment metadata: | ||||||||||||||||||||||||||||||
… spec: template: metadata: annotations: sidecar.istio.io/proxyCPU: 200m sidecar.istio.io/proxyCPULimit: “1” sidecar.istio.io/proxyMemory: 128Mi sidecar.istio.io/proxyMemoryLimit: 512Mi | … spec: template: metadata: annotations: sidecar.istio.io/proxyCPU: 200m sidecar.istio.io/proxyCPULimit: “1” sidecar.istio.io/proxyMemory: 128Mi sidecar.istio.io/proxyMemoryLimit: 512Mi | ||||||||||||||||||||||||||||||
… rest of your deployment spec | … остальная часть манифеста | ||||||||||||||||||||||||||||||
For ReplicaSets: | Для ReplicaSet: | ||||||||||||||||||||||||||||||
yaml apiVersion: apps/v1 kind: ReplicaSet metadata: | yaml apiVersion: apps/v1 kind: ReplicaSet metadata: | ||||||||||||||||||||||||||||||
… spec: template: metadata: annotations: sidecar.istio.io/proxyCPU: 200m sidecar.istio.io/proxyCPULimit: “1” sidecar.istio.io/proxyMemory: 128Mi sidecar.istio.io/proxyMemoryLimit: 512Mi | … spec: template: metadata: annotations: sidecar.istio.io/proxyCPU: 200m sidecar.istio.io/proxyCPULimit: “1” sidecar.istio.io/proxyMemory: 128Mi sidecar.istio.io/proxyMemoryLimit: 512Mi | ||||||||||||||||||||||||||||||
… rest of your deployment spec | … остальная часть манифеста | ||||||||||||||||||||||||||||||
For Pod: | Для Pod: | ||||||||||||||||||||||||||||||
yaml apiVersion: v1 kind: Pod metadata: annotations: sidecar.istio.io/proxyCPU: 200m sidecar.istio.io/proxyCPULimit: “1” sidecar.istio.io/proxyMemory: 128Mi sidecar.istio.io/proxyMemoryLimit: 512Mi | yaml apiVersion: v1 kind: Pod metadata: annotations: sidecar.istio.io/proxyCPU: 200m sidecar.istio.io/proxyCPULimit: “1” sidecar.istio.io/proxyMemory: 128Mi sidecar.istio.io/proxyMemoryLimit: 512Mi | ||||||||||||||||||||||||||||||
… rest of your pod spec | … остальная часть манифеста | ||||||||||||||||||||||||||||||
All four parameters must be defined together - if you set any of these annotations, you must specify all four ( | Все четыре параметра должны быть указаны вместе — |